Hack: A Fast Network Scanning Program

I was searching for a simple tool which can do a port scanning in a huge network quickly without making me wait for ages. I first thought of using nmap, but it was a bit too complex and it takes a lot of time to discover the machines even after optimizing the parameters. After searching a lot, I wrote to one of my seniors, Sandeep Kumar, asking the details of his program which maintains a list of active FTP servers in the network. He replied with a reference to his own findings about the network scanning tools. He is using an enhanced version of a program originally written by Troy Robinson. I tried the program out of curiosity and found out that its damn fast as compared to nmap (no literal comparison) 🙂 The program can be downloaded from here.

How to use

Compile the program using gcc as

[root@localhost ~]# gcc NetworkScanner.c [ENTER]

Now create a file IPRange.txt containing the IP address ranges for your network. The contents of the file may be

172.16.*.* Meaning all the IP address with first two parts as 172.16 and rest of the address will be generated by permutations.

172.16.1-16.* Meaning the first two parts are fixed. Third part will vary from 1 to 16. And the fourth part will be permuted from 0 to 255.

So an IPRange.txt may look like

1
2
172.16.1-16.*
192.168.36.*

Now run the program as

[root@localhost ~]# ./a.out port_to_be_scanned Parallel_attempts IP_list_file output.txt [ENTER]

Parallel_attempts is the number of processes that’ll be forked for scanning the network port. It is safe to have its value as 255. A very high value may hog the network or may even slow down your machine. So an example run would be

[root@localhost ~]# ./a.out 21 255 IPRange.txt Output.txt [ENTER]

Benchmarks

I carried out a lot of test on my network using the following setup and parameters

Machine : AMD X2 5600+ (2.6GHz Dual Core), 4GB 800MHz DDR2 RAM, Gigabit Ethernet Card (on 100mbps network).

Port : 21 (FTP)

IPRange.txt : Total 16896 IP Addresses

1
2
3
4
5
Machines on wired (100mbps) network
172.16.1-48.* 
192.168.36.*
Machines on wireless (54mbps) network
172.17.0-16.*

Network Scanner Benchmarks

Parallel Attempts

Scanning Time (seconds)

Upload Bandwidth (kbps)

255 180 13
512 90 25
1024 47 55
2048 25 100
4096 14 205
6144 11 307
8192 9 374

The interval between two scans was almost 30-40 seconds. I think parallelism beyond 8192 will crash my machine, so I didn’t try. You can try it at your own risk 🙂 I hope this program help you scan your network.


How To: Install Fedora without CD or DVD

Note: If you are new to Fedora/Linux, I highly recommend the book “Fedora Linux Toolbox

[amazon-product alink=”0000FF” bordercolor=”000000″ height=”240″]0470082917[/amazon-product]

Use Case

  1. When you don’t have CD / DVD drive on your system.
  2. You have Fedora DVD but your system has only a CD Drive.
  3. You don’t want to waste time and resources in burning iso on optical media.

Pre-requisites

  1. You have a Fedora DVD iso or rescue cd iso.
  2. You have a Linux installation on your system.
  3. You have a partition (FAT32, ext2, ext3) which you will not format while installing the new OS.

How to proceed

Let us assume you want to install Fedora 9 on your system and you have a Linux distro already installed on your system. You have downloaded the Fedora DVD iso (Fedora-9-DVD-i686.iso). And you have a FAT32/ext2/ext3 partition /stuff/ which you will not format during installation.

Step 1 : Move the Fedora DVD iso to /stuff/ directory.

[root@saini saini]# mv Fedora-9-DVD-i686.iso /stuff/ [Enter]

Step 2 : Mount Fedora DVD iso on /mnt/

[root@saini saini]# mount /stuff/Fedora-9-DVD-i686.iso /mnt/ -ro loop [Enter] (do as root)

Step 3 : Copy the initrd.img and vmlinuz to /boot/ partition

[root@saini saini]# cd /mnt/isolinux/ [Enter]
[root@saini isolinux]# cp initrd.img vmlinuz /boot/ [Enter] (do as root)

Step 4 : Create grub entry for booting into Fedora 9

Add these lines at the end of your /boot/grub/grub.conf file.

title Fedora 9 (New installation)
    kernel /vmlinuz
    initrd /initrd.img

Step 5 : Note the device having Fedora DVD iso

[root@saini saini]# df -h [Enter]
Filesystem            Size  Used Avail Use% Mounted on
/dev/sda3              15G  9.5G  4.1G  70% /
/dev/sda8             135G  116G   13G  91% /stuff
/dev/sda5             4.8G  1.2G  3.4G  26% /home
/dev/sda1              99M   12M   82M  13% /boot

In this case /dev/sda8 contains Fedora DVD iso. Note this down as you need it later.

Step 6 : Reboot

Reboot your system and boot into the Fedora 9 (New installation) grub entry.

Step 7 : Install from hard disk

While in installation wizard, select “Hard drive” as installation method and choose /dev/sda8 as it contains the Fedora DVD iso. And rest is damn easy.


How To: Write Custom Redirector or Rewritor Plugin For Squid in Python

Mission

To write a custom Python program which can act as a plugin for Squid to redirect a given URL to another URL. This is useful when already existing redirector plugins for Squid doesn’t suit your needs or you want everything of your own.

Use Cases

  1. When you want to redirect URLs using a database like mysql or postgresql.
  2. When you want to redirect based on mappings stored in simple text files.
  3. When you want to build a redirector which can learn by itself using AI techniques 😛

How to proceed

From Squid FAQ,

The redirector program must read URLs (one per line) on standard input, and write rewritten URLs or blank lines on standard output. Note that the redirector program can not use buffered I/O. Squid writes additional information after the URL which a redirector can use to make a decision.

The format of the line read from the standard input by the program is as follows.

1
2
3
URL ip-address/fqdn ident method
# for example
http://saini.co.in 172.17.8.175/saini.co.in - GET -

The implementation sounds very simple and it is indeed very simple to implement. The only thing that should be taken care of is the unbuffered I/O. You should immediately flush the output to standard output once decision is taken.

For this howto, we assume we have a method called ‘modify_url()‘ which returns either a blank line or a modified URL to which the client should be redirected.

1
2
3
4
5
6
7
8
9
10
11
12
13
14
15
16
17
18
19
20
21
22
23
24
25
26
#!/usr/bin/env python
 
import sys
def modify_url(line):
    list = line.split(' ')
    # first element of the list is the URL
    old_url = list[0]
    new_url = '\n'
    # take the decision and modify the url if needed
    # do remember that the new_url should contain a '\n' at the end.
    if old_url.endswith('.avi'):
        new_url = 'http://fedora.co.in/errors/accessDenied.html' + new_url
    return new_url
 
while True:
    # the format of the line read from stdin is
    # URL ip-address/fqdn ident method
    # for example
    # http://saini.co.in 172.17.8.175/saini.co.in - GET -
    line = sys.stdin.readline().strip()
    # new_url is a simple URL only
    # for example
    # http://fedora.co.in
    new_url = modify_url(line)
    sys.stdout.write(new_url)
    sys.stdout.flush()

Save the above file somewhere. We save this example file in /etc/squid/custom_redirect.py. Now, we have the function for redirecting clients. We need to configure squid to use custom_redirect.py . Below is the squid configuration for telling squid to use the above program as redirector.

1
2
3
4
5
6
# Add these lines to /etc/squid/squid.conf file.
# /usr/bin/python should be replaced by the path to python executable if you installed it somewhere else.
redirect_program /usr/bin/python /etc/squid/custom_redirect.py
# Number of instances of the above program that should run concurrently.
# 5 is good enough but you should go for 10 at least. Anything below 5 would not work properly.
redirect_children 5

Now, start/reload/restart squid. That’s all we need to write and use a custom redirector plugin for squid.


How To: Write Custom Basic Authentication Plugin for Squid in Python

Mission

To write a Python program which can be used to authenticate for Squid proxy server. This is useful when you don’t want to configure complex systems like LDAP, ntlm etc.

Use Cases

  1. When you want to authenticate clients using mysql database.
  2. When you want to authenticate clients using flat files or /etc/passwd file or some custom service on your network.

How to proceed

From auth_param section in squid.conf file:

Specify the command for the external authenticator. Such a program reads a line containing "username password" and replies "OK" or "ERR" in an endless loop. "ERR" responses may optionally be followed by a error description available as %m in the returned error page.

By default, the basic authentication scheme is not used unless a program is specified.

That clearly states that our python program should read a line from standard input (stdin) and write the appropriate response to the standard output (stdout). But there are some issues with I/O. The output should be unbuffered and should be flushed to standard output immediately after the response is known.

So, lets see a small program where we authenticate using a function ‘matchpassword()‘. This function returns True when username, password pair matches and returns False when they mismatch.

1
2
3
4
5
6
7
8
9
10
11
12
13
14
15
16
17
18
19
20
21
22
23
24
25
#!/usr/bin/python
 
import sys
import socket
"""USAGE:The function returns True if the user and passwd match False otherwise"""
def matchpasswd(login,passwd):
    # Write your own function definition. 
    # Use mysql, files, /etc/passwd or some service or whatever you want
    pass
 
while True:
    # read a line from stdin
    line = sys.stdin.readline()
    # remove '\n' from line
    line = line.strip()
    # extract username and password from line
    username = line[:line.find(' ')]
    password = line[line.find(' ')+1:]
 
    if matchpasswd(username, password):
        sys.stdout.write('OK\n')
    else:
        sys.stdout.write('ERR\n')
    # Flush the output to stdout.
    sys.stdout.flush()

Save the above file somewhere. We save this example file in /etc/squid/custom_auth.py .Now, we have the function for authenticating clients. We need to configure squid to use custom_auth.py . Below is the squid configuration for telling squid to use the above program as basic authenticator.

1
2
3
4
5
6
7
8
9
10
11
# you need to specify /usr/bin/python if your file is not executable and needs an interpreter to be invoked.
# Replace /usr/bin/python with /usr/bin/php , if you write auth program in php.
auth_param basic program /usr/bin/python /etc/squid/custom_auth.py
# how many instances of the above program should run concurrently
auth_param basic children 5
# display some message to clients when they are asked for username, password
auth_param basic realm Please enter your proxy server username and password
# for how much time the authentication should be valid
auth_param basic credentialsttl 2 hours
# whether username, password should be case sensitive or not
auth_param basic casesensitive on

Now, to force clients to authenticate, configure the acls as follow. Below we assume, you want to force all clients on your lan to authenticate for using proxy server.

1
2
3
4
5
6
# acl to force proxy authentication
acl authenticated proxy_auth REQUIRED
# acl to define IPs from your lan
acl lan src 192.168.0.0/16
# acl to force clients on your lan to authenticate
http_access allow lan authenticated

Now, reload/restart squid. That’s all we need to write and use a custom authentication plugin for squid.

Limitation

Username can’t contain spaces. Otherwise program will not be able to parse/extract username, password from standard input.


How To: Install FFMPEG and FFMPEG-PHP

I was randomly browsing the internet and reading about making a website look better and I encountered ffmpeg-php. ffmpeg is a very powerful tool to record, convert and stream audio and video. Its a very rich tool almost supporting every format out there in the world. It can convert any format to any other format provided the codec. ffmpeg-php is an extension for PHP that provides a rich library to access info about audio and video files. The good thing about ffmpeg-php is that it can retrieve all info about any audio/video file subjected to the condition that the particular audio/video format is supported by your ffmpeg installation. So, now you have a clear idea that you can do wonders with audio/videos while showing them on your site 🙂

I tried some of the functionalities and they worked out of the box. Here’s is complete how to on installing ffmpeg and ffmpeg-php.

FFMPEG:

I tried installing ffmpeg from rpms provided by several Fedora repositories but after installation ffmpeg doesn’t seem to work. After several tries, I installed ffmpeg from source rpms and it worked. Below, I will describe how to install ffmpeg from source rpm.

Step 1:

Make sure that you have ‘rpmbuild’ installed by issuing

[root@bordeaux saini]# rpm -q rpmbuild [Enter]

command. If the above says that rpmbuild is not installed, then install it using yum as given below

[root@bordeaux saini]# yum install rpmbuild [Enter] (do as root)

Step 2:

Download the latest src rpm of ffmpeg from rpmfind.net. Issue the command given below

[root@bordeaux saini]# rpm -hiv ffmpeg-x.x.x.xx-xxx.src.rpm [Enter] (do as root)

Step 3:

Go to ‘/usr/src/redhat/SPECS/’ directory and issue the command given below

1
2
[root@bordeaux saini]# cd /usr/src/redhat/SPECS/ [Enter]
[root@bordeaux SPECS]# rpmbuild -ba ffmpeg.spec [Enter] (do as root)

If it gives an error like package ‘xyz’ is need by ffmpeg. Then install the package ‘xyz’ using yum as

[root@bordeaux SPECS]# yum install xyz [Enter] (do as root)

After installing the dependencies, issue the rpmbuild command ‘rpmbuild -ba ffmpeg.spec’. Now ffmpeg rpms will be build and they will be stored in ‘/usr/src/redhat/RPMS/i386/’.

Step 4:

Go the ‘/usr/src/redhat/RPMS/i386/’ (x86_64 instead of i386 if your OS is 64 bit). Install all the rpms that were built by rpmbuild.

[root@bordeaux saini]# rpm -hiv *.rpm [Enter] (do as root)

Thats it. ffmpeg is now successfully installed on your computer. Half the job is done. Now lets proceed with ffmpeg-php installation.

FFMPEG-PHP:

We will install ffmpeg-php from source bundle.

Step 1:

Make sure that ‘php-devel’ installed on your machine by issuing

[root@bordeaux saini]# rpm -q php-devel [Enter]

command. If the above command says the ‘php-devel’ is not installed, then install it using the following command.

[root@bordeaux saini]# yum install php-devel [Enter] (do as root)

Step 2:

Download the latest version of ffmpeg-php from here. Unpack the file you have downloaded.

1
2
[root@bordeaux saini]# bunzip2 -d ffmpeg-php-0.5.1.tbz2 [Enter]
[root@bordeaux saini]# tar -xvf ffmpeg-php-0.5.1.tar [Enter]

Step 3:

Issue the following command in sequence if everything goes fine.

1
2
3
4
5
[root@bordeaux saini]# cd ffmpeg-php-0.5.1 [Enter]
[root@bordeaux ffmpeg-php-0.5.1]# phpize [Enter]
[root@bordeaux ffmpeg-php-0.5.1]# ./configure [Enter]
[root@bordeaux ffmpeg-php-0.5.1]# make [Enter]
[root@bordeaux ffmpeg-php-0.5.1]# make install [Enter] (do as root)

Step 4:

Open ‘/etc/php.ini’ and add a line ‘extension=ffmpeg.so’ in the category ‘Dynamic Extensions’. For help see the image below.
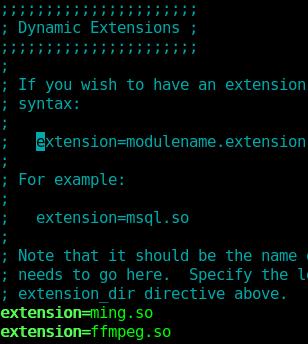
FFMPEG PHP PHPini Module

Step 5:

Restart apache web server aka ‘httpd’ service by issuing the command.

[root@bordeaux saini]# service httpd restart [Enter] (do as root)

Step 6:

Write a test php file and test your ffmpeg-php installation.

phpinfo();

Save the above code in ‘info.php’ and save the file in ‘/var/www/html/’ and browse http://localhost/info.php . If you see something like this.
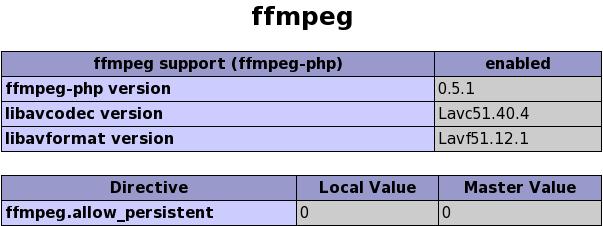
FFMPEG PHP Linux
Then the ffmpeg-php is successfully installed on your machine. Now you can jump into the world of video manipulation via your website.