How To: Write Custom Basic Authentication Plugin for Squid in Python

Mission

To write a Python program which can be used to authenticate for Squid proxy server. This is useful when you don’t want to configure complex systems like LDAP, ntlm etc.

Use Cases

  1. When you want to authenticate clients using mysql database.
  2. When you want to authenticate clients using flat files or /etc/passwd file or some custom service on your network.

How to proceed

From auth_param section in squid.conf file:

Specify the command for the external authenticator. Such a program reads a line containing "username password" and replies "OK" or "ERR" in an endless loop. "ERR" responses may optionally be followed by a error description available as %m in the returned error page.

By default, the basic authentication scheme is not used unless a program is specified.

That clearly states that our python program should read a line from standard input (stdin) and write the appropriate response to the standard output (stdout). But there are some issues with I/O. The output should be unbuffered and should be flushed to standard output immediately after the response is known.

So, lets see a small program where we authenticate using a function ‘matchpassword()‘. This function returns True when username, password pair matches and returns False when they mismatch.

1
2
3
4
5
6
7
8
9
10
11
12
13
14
15
16
17
18
19
20
21
22
23
24
25
#!/usr/bin/python
 
import sys
import socket
"""USAGE:The function returns True if the user and passwd match False otherwise"""
def matchpasswd(login,passwd):
    # Write your own function definition. 
    # Use mysql, files, /etc/passwd or some service or whatever you want
    pass
 
while True:
    # read a line from stdin
    line = sys.stdin.readline()
    # remove '\n' from line
    line = line.strip()
    # extract username and password from line
    username = line[:line.find(' ')]
    password = line[line.find(' ')+1:]
 
    if matchpasswd(username, password):
        sys.stdout.write('OK\n')
    else:
        sys.stdout.write('ERR\n')
    # Flush the output to stdout.
    sys.stdout.flush()

Save the above file somewhere. We save this example file in /etc/squid/custom_auth.py .Now, we have the function for authenticating clients. We need to configure squid to use custom_auth.py . Below is the squid configuration for telling squid to use the above program as basic authenticator.

1
2
3
4
5
6
7
8
9
10
11
# you need to specify /usr/bin/python if your file is not executable and needs an interpreter to be invoked.
# Replace /usr/bin/python with /usr/bin/php , if you write auth program in php.
auth_param basic program /usr/bin/python /etc/squid/custom_auth.py
# how many instances of the above program should run concurrently
auth_param basic children 5
# display some message to clients when they are asked for username, password
auth_param basic realm Please enter your proxy server username and password
# for how much time the authentication should be valid
auth_param basic credentialsttl 2 hours
# whether username, password should be case sensitive or not
auth_param basic casesensitive on

Now, to force clients to authenticate, configure the acls as follow. Below we assume, you want to force all clients on your lan to authenticate for using proxy server.

1
2
3
4
5
6
# acl to force proxy authentication
acl authenticated proxy_auth REQUIRED
# acl to define IPs from your lan
acl lan src 192.168.0.0/16
# acl to force clients on your lan to authenticate
http_access allow lan authenticated

Now, reload/restart squid. That’s all we need to write and use a custom authentication plugin for squid.

Limitation

Username can’t contain spaces. Otherwise program will not be able to parse/extract username, password from standard input.


How To: Configure Hierarchicy of Proxy Servers (Squid)

Yesterday I came across this idea of caching all the data that I browse on my hard disk so that the average load time of a website decreases. Actually the idea is I’ll cache all the static data that I browse like images, static html pages, CSS files and similar things which does not change frequently and can be served from the cache. But while setting up the proxy server on my machine, I faced the problem that my machine which is going to act as a proxy server is behind my institute’s proxy. So, a simple caching proxy server can’t serve my needs and I have to really figure out how to setup a hierarchical proxy server. Below we’ll see how to setup a hierarchical proxy server.

Approach

When I thought of setting up a caching proxy server, squid immediately struck my mind. Actually I don’t know about any other proxy servers. I never setup proxy server before this ( I tried a lot of time, but in vain). So, I started googling about squid setup. There were a lot of tutorials, but either they were too small to get things going or they were too verbose that I couldn’t manage to read them. So, I directly jump into squid configuration file squid.conf . And with references from here and there, I managed to setup the proxy server successfully.

Note: The configurations below worked on Fedora 7 with squid 2.6STABLE16. The same configurations may work with other squid versions and on other operating systems as well, but try them at your own risk.

Part 1 : Setting up simple proxy server with squid

Setting up a very simple and usable proxy server is really easy. You need to add/edit only 2-3 lines /etc/squid/squid.conf to get started.

Add your ip to the access list.

1
2
3
acl myip src 172.17.8.175 #<your_ip_which_will_use_the_proxy_server> (e.g. )
http_access allow myip
http_port 8080 #<http_proxy_port> (this is 3128 by default. you can set it to anything you like. e.g. 8080)

Save the squid.conf file. Then issue these commands.

1
2
[root@localhost squid]# squid -z [Enter] (as root) (This needs to be executed only once.)
[root@localhost squid]# service squid start [Enter] (as root)

If you want to start the squid server on boot, issue this command.

[root@localhost squid]# chkconfig --level 345 squid on [Enter] (as root)

Now, your machine is a proxy server. You can setup your browser to use the machine as a proxy server.

Conditions

The proxy server will work only if your machine has a public IP and is directly connected to internet.

Part 2: Setting up a hierarchical caching proxy server with squid

The above setup works fine if a machine is directly connected to internet. But my machine itself is behind a proxy, so setting up a proxy on my machine is of no use unless the proxy on my machine uses the institute proxy for connecting to internet. So, here we jump into squid.conf again and this time we have to really do some brain storming. If you are a newbie to Linux and don’t know how to make a system work when nothing seems to help, you will probably be better off by using institute’s proxy.

Here is the scenario.

1
2
3
4
5
6
7
8
9
10
11
12
13
1. Your browser sends a content request to proxy on your machine.
2. Check: if a cache HIT from institute proxy cache (HIT means content was found in cache)
	2a. Check: if content is older than the original upstream content
		2aa. Fetch content from upstream and serve the client
	2b. else
		2ba. Serve the content from the cache
3. Check: if cache HIT from proxy on your machine
	3a. Check: if content is older than the original upstream content
		3aa. Fetch content from upstream and serve the client
	3b. else
		3ba. Serve the content from the cache
4. Cache MISS from both the proxies
	4a. Fetch the content from upstream and serve the client

The above method of operation is very basic and is my understanding of squid. It may not be the exact squid behavior.

Now, lets see the configurations needed for setting up the hierarchical caching proxy server with squid.

Assumptions

I assume that we already have squid setup at institute’s proxy whether in caching mode or not. The best way to add/edit the following lines in your squid.conf is to search for particular parameter and then edit the value to set as given.

I also assume that you have simple proxy server setup on your machine and now we want to make it act as child proxy of the institute’s proxy.

Configuration

1
2
3
4
5
6
7
8
9
10
11
12
13
14
15
16
17
18
19
20
21
22
23
24
25
26
27
28
29
30
31
32
33
34
35
36
37
38
39
40
41
42
43
44
45
46
47
48
49
50
51
52
53
54
55
56
57
58
59
60
61
62
63
64
65
66
67
68
69
70
71
# Your local machine will act as a sibling proxy
cache_peer 172.17.8.175 sibling 3128 3130 no-query weight=10
# The institute's proxy server will act as a parent proxy
# 'default' mean the last-resort
cache_peer 192.168.36.204 parent 8080 3130 no-query proxy-only no-digest default
# allow accessing peer cache for access list 'myip'
cache_peer_access 172.17.8.175 allow myip
# Don't cache dynamic content
hierarchy_stoplist cgi-bin ?
acl QUERY urlpath_regex cgi-bin \?
cache deny QUERY
# Size of main memory to be used for caching
cache_mem 200 MB
# max size of content to be stored in main memory
maximum_object_size_in_memory 7000 KB
# policy for cache replacement if memory is full
cache_replacement_policy heap LFUDA
# the directory to be used for storing cache on your hdd
cache_dir aufs /var/spool/squid 200 16 256
# max file descriptor open at a time .. 0(unlimited)
max_open_disk_fds 0
# min object size to cache on hdd
minimum_object_size 0 KB
# max object size to cache on hdd
maximum_object_size 16384 KB
# access log
access_log /var/log/squid/access.log squid
refresh_pattern ^ftp:           1440    20%     10080
refresh_pattern ^gopher:        1440    0%      1440
refresh_pattern .               0       20%     4320
store_avg_object_size 20 KB
acl apache rep_header Server ^Apache
broken_vary_encoding allow apache
refresh_stale_hit 5 seconds
acl SSL_ports port 443 563 1863 5190 5222 5050 6667
# Allow AIM protocols
acl AIM_ports port 5190 9898 6667
acl AIM_domains dstdomain .oscar.aol.com .blue.aol.com .freenode.net
acl AIM_domains dstdomain .messaging.aol.com .aim.com
acl AIM_hosts dstdomain login.oscar.aol.com login.glogin.messaging.aol.com toc.oscar.aol.com irc.freenode.net
acl AIM_nets dst 64.12.0.0/255.255.0.0
acl AIM_methods method CONNECT
http_access allow AIM_methods AIM_ports AIM_nets
http_access allow AIM_methods AIM_ports AIM_hosts
http_access allow AIM_methods AIM_ports AIM_domains
# Allow Yahoo Messenger
acl YIM_ports port 5050
acl YIM_domains dstdomain .yahoo.com .yahoo.co.jp
acl YIM_hosts dstdomain scs.msg.yahoo.com cs.yahoo.co.jp
acl YIM_methods method CONNECT
http_access allow YIM_methods YIM_ports YIM_hosts
http_access allow YIM_methods YIM_ports YIM_domains
# Allow GTalk
acl GTALK_ports port 5222 5050
acl GTALK_domains dstdomain .google.com
acl GTALK_hosts dstdomain talk.google.com
acl GTALK_methods method CONNECT
http_access allow GTALK_methods GTALK_ports GTALK_hosts
http_access allow GTALK_methods GTALK_ports GTALK_domains
# Allow MSN
acl MSN_ports port 1863 443 1503
acl MSN_domains dstdomain .microsoft.com .hotmail.com .live.com .msft.net .msn.com .passport.com
acl MSN_hosts dstdomain messenger.hotmail.com
acl MSN_nets dst 207.46.111.0/255.255.255.0
acl MSN_methods method CONNECT
http_access allow MSN_methods MSN_ports MSN_hosts
# Turn this off if hierarchical behavior is needed
nonhierarchical_direct off
never_direct deny myip
hosts_file /etc/hosts
coredump_dir /var/spool/squid

That’s the minimal configuration you need for running squid in hierarchical way. Save the squid.conf file and start/restart/reload the squid service. Setup your browser to use your machine as proxy and while using it’ll cache all the static content. You should experience some reduction in average page load time.

Advantages

I am currently using squid in above configuration. And its turning out to be nice for me. I am browsing websites faster and saving a chunk of bandwidth for my institute.

Disadvantages

Introduction of another proxy server increases the latency for dynamic content.

Notice

The above configurations and views are a result of my understanding of squid. If you feel this may break your system or it may have adverse effects, don’t use them. At least don’t use these on a production system.
 

How To: Install FFMPEG and FFMPEG-PHP

I was randomly browsing the internet and reading about making a website look better and I encountered ffmpeg-php. ffmpeg is a very powerful tool to record, convert and stream audio and video. Its a very rich tool almost supporting every format out there in the world. It can convert any format to any other format provided the codec. ffmpeg-php is an extension for PHP that provides a rich library to access info about audio and video files. The good thing about ffmpeg-php is that it can retrieve all info about any audio/video file subjected to the condition that the particular audio/video format is supported by your ffmpeg installation. So, now you have a clear idea that you can do wonders with audio/videos while showing them on your site 🙂

I tried some of the functionalities and they worked out of the box. Here’s is complete how to on installing ffmpeg and ffmpeg-php.

FFMPEG:

I tried installing ffmpeg from rpms provided by several Fedora repositories but after installation ffmpeg doesn’t seem to work. After several tries, I installed ffmpeg from source rpms and it worked. Below, I will describe how to install ffmpeg from source rpm.

Step 1:

Make sure that you have ‘rpmbuild’ installed by issuing

[root@bordeaux saini]# rpm -q rpmbuild [Enter]

command. If the above says that rpmbuild is not installed, then install it using yum as given below

[root@bordeaux saini]# yum install rpmbuild [Enter] (do as root)

Step 2:

Download the latest src rpm of ffmpeg from rpmfind.net. Issue the command given below

[root@bordeaux saini]# rpm -hiv ffmpeg-x.x.x.xx-xxx.src.rpm [Enter] (do as root)

Step 3:

Go to ‘/usr/src/redhat/SPECS/’ directory and issue the command given below

1
2
[root@bordeaux saini]# cd /usr/src/redhat/SPECS/ [Enter]
[root@bordeaux SPECS]# rpmbuild -ba ffmpeg.spec [Enter] (do as root)

If it gives an error like package ‘xyz’ is need by ffmpeg. Then install the package ‘xyz’ using yum as

[root@bordeaux SPECS]# yum install xyz [Enter] (do as root)

After installing the dependencies, issue the rpmbuild command ‘rpmbuild -ba ffmpeg.spec’. Now ffmpeg rpms will be build and they will be stored in ‘/usr/src/redhat/RPMS/i386/’.

Step 4:

Go the ‘/usr/src/redhat/RPMS/i386/’ (x86_64 instead of i386 if your OS is 64 bit). Install all the rpms that were built by rpmbuild.

[root@bordeaux saini]# rpm -hiv *.rpm [Enter] (do as root)

Thats it. ffmpeg is now successfully installed on your computer. Half the job is done. Now lets proceed with ffmpeg-php installation.

FFMPEG-PHP:

We will install ffmpeg-php from source bundle.

Step 1:

Make sure that ‘php-devel’ installed on your machine by issuing

[root@bordeaux saini]# rpm -q php-devel [Enter]

command. If the above command says the ‘php-devel’ is not installed, then install it using the following command.

[root@bordeaux saini]# yum install php-devel [Enter] (do as root)

Step 2:

Download the latest version of ffmpeg-php from here. Unpack the file you have downloaded.

1
2
[root@bordeaux saini]# bunzip2 -d ffmpeg-php-0.5.1.tbz2 [Enter]
[root@bordeaux saini]# tar -xvf ffmpeg-php-0.5.1.tar [Enter]

Step 3:

Issue the following command in sequence if everything goes fine.

1
2
3
4
5
[root@bordeaux saini]# cd ffmpeg-php-0.5.1 [Enter]
[root@bordeaux ffmpeg-php-0.5.1]# phpize [Enter]
[root@bordeaux ffmpeg-php-0.5.1]# ./configure [Enter]
[root@bordeaux ffmpeg-php-0.5.1]# make [Enter]
[root@bordeaux ffmpeg-php-0.5.1]# make install [Enter] (do as root)

Step 4:

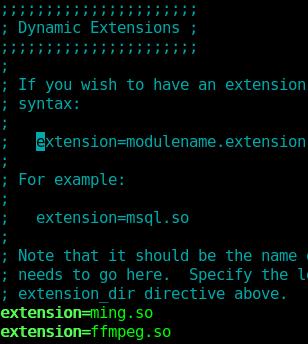
Open ‘/etc/php.ini’ and add a line ‘extension=ffmpeg.so’ in the category ‘Dynamic Extensions’. For help see the image below.
FFMPEG PHP PHPini Module

Step 5:

Restart apache web server aka ‘httpd’ service by issuing the command.

[root@bordeaux saini]# service httpd restart [Enter] (do as root)

Step 6:

Write a test php file and test your ffmpeg-php installation.

phpinfo();

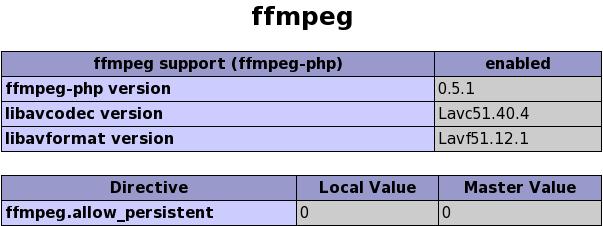
Save the above code in ‘info.php’ and save the file in ‘/var/www/html/’ and browse http://localhost/info.php . If you see something like this.
FFMPEG PHP Linux
Then the ffmpeg-php is successfully installed on your machine. Now you can jump into the world of video manipulation via your website.


How To: Configure VNC Server

Vncserver is just another application available in almost all the available Linux based distros. Configuring vncserver is very easy. But the default desktop view in vncviewer is gray scale desktop with very pathetic GUI. To view normal Gnome or KDE desktop in vncviewer, assigning a custom port for usage, user configuration and to adjust the resolution of the vncviewer window, some files need to be configured properly. Here are the required configuration in any version of Fedora/Fedora Core. But with minor modifications these can be applied to other distros like Ubuntu, SuSE, Gentoo etc.

Step 1: Installing Vncviewer, Vncserver

As root do this

[root@bordeaux saini]# yum install vnc [Enter]

Step 2: Configuring resolution, port & user

The default location of server configuration file for vncserver is ‘/etc/sysconfig/’. To configure the resolution, user and port open ‘/etc/sysconfig/vncservers’ in you favorite editor and add two lines per user configuration shown ..

VNCSERVERS=":"
VNCSERVERARGS[]="-geometry x x"

Example :

VNCSERVERS="3:saini"
VNCSERVERARGS[3]="-geometry 1000x700"

You can choose any display port, but it should not be in use by another X server. Window height and width can be anything (not in fraction of course). But keep in mind that the system on which you are going to view the desktop using vncviewer should have greater resolution than what you specify here, otherwise scrollbars will appear.

Step 3: Configuring Desktop Environment

The user specific configuration files of vncviewer resides in ‘.vnc’ directory in user’s home directory. (e.g. ‘/home/saini/.vnc/’). Open ‘.vnc/xstartup’ in your favorite editor and edit as below

  • For Gnome

The ‘xstartup’ file shout look like this

#!/bin/sh
 
# Uncomment the following two lines for normal desktop:
unset SESSION_MANAGER
exec /etc/X11/xinit/xinitrc
 
[ -x /etc/vnc/xstartup ] &amp;&amp; exec /etc/vnc/xstartup
[ -r $HOME/.Xresources ] &amp;&amp; xrdb $HOME/.Xresources
#xsetroot -solid grey
#vncconfig -iconic &amp;
#xterm -geometry 80x24+10+10 -ls -title "$VNCDESKTOP Desktop" &amp;
#twm &amp;
startx &amp;
  • For KDE

The ‘xstartup’ file should look like this

#!/bin/sh
 
# Uncomment the following two lines for normal desktop:
#unset SESSION_MANAGER
#exec /etc/X11/xinit/xinitrc
 
[ -x /etc/vnc/xstartup ] &amp;&amp; exec /etc/vnc/xstartup
[ -r $HOME/.Xresources ] &amp;&amp; xrdb $HOME/.Xresources
#xsetroot -solid grey
#vncconfig -iconic &amp;
#xterm -geometry 80x24+10+10 -ls -title "$VNCDESKTOP Desktop" &amp;
#twm &amp;
startkde &amp;

Step 4: Configuring password

For setting up vncviewer password for user ‘xyz’, login as user ‘xyz’ and issue ‘vncpasswd’ command on a terminal/konsole (or whatever). Enter password twice and you are done with password setting.

Step 5: Starting Vncserver

To start vncserver, login as root and issue ‘service vncserver start’ command. If service started successfully, you are ready to use vncviewer on a remote/local machine.

Step 6: Accessing through Vncviewer

  • From Linux based machines
[saini@bordeaux saini]# vncviewer IP_Address:displayPort [Enter] #(IP Address is for the machine where you set up vncserver)
  • From Windows

On windows there is a software called RealVnc. Install it and enter <IPAddress>:<displayPort> in the dialog box.
[I explained how to connect via windows because it may help someone get a bit of relief.]

Screenshots:

  • Vncviewer with Gnome as Desktop environment

VNC Server VNC Viewer Screenshot GNOME

  • Vncviewer with KDE as Desktop environment

VNC Server VNC Viewer Screenshot KDE

Vnc is nice tool if you want to avoid using windows. I use it all the time. While I am forced to work on windows system, I install vncviewer and use it in full screen mode 😛 It also helps when you want to run some gui based application and monitor is remotely. Because if you close vncviewer window and use vncviewer again, you will be given the desktop session where you left it (all windows open and applications running).


How To: Install PHP-Ming

Yesterday, I came across a library called ming for php which can do wonders while converting videos to .swf (flash), images to .swf and much more. The best thing is that ming provides wrappers in C/C++/PHP/Python/Perl/Tcl etc. So, can be used within any one of these languages. But, the damn thing drove me crazy while installing. It was very tough experience installing it as the available howtos didn’t help much. But finally I somehow managed with the installation and it worked 🙂 So, I thought of writing this how to, so that anyone having the same problem can find it helpful.

Here is a complete howto on installing php-ming in Fedora. (I installed it on Fedora 7 and with php5, but howto is supposed to work with other versions as well.) Though there are rpms available for earlier versions of ming, but I wanted the latest, so installed from source.

Resources:
libming : http://www.libming.net/
PHP : http://php.net/

Step 1

First of all make sure that you have php-devel package, otherwise you will not be able to install ming at all. Do the following as root.

[root@bordeaux root]# rpm -q php-devel [Enter]

If the above command says php-devel is not installed, then fetch php-devel for your php version from here and install as given below, else proceed to step 2.

[root@bordeaux root]# rpm -hiv php-devel-5.2.2-3.i386.rpm [Enter]

Step 2

Download latest version of ming from here.

Step 3

Untar the downloaded package.

[saini@bordeaux saini]# tar -xvzf ming-0.4.0.beta5.tar.gz [Enter]

Step 4

Change directory to ‘./ming-0.4.0.beta5’ and issue ./configure and make as given below

1
2
3
4
[saini@bordeaux saini]# cd ming-0.4.0.beta5 [Enter]
[saini@bordeaux ming-0.4.0.beta5]# ./configure --enable-cXX --enable-php [Enter]
[saini@bordeaux ming-0.4.0.beta5]# make [Enter]
[root@bordeaux ming-0.4.0.beta5]# make install [Enter] (as root)

Step 5

Go to ‘./php_ext’ directory and issue ‘make’ and ‘make install’.

1
2
3
[saini@bordeaux ming-0.4.0.beta5]# cd php_ext [Enter]
[saini@bordeaux php_ext]# make [Enter]
[root@bordeaux php_ext]# make install [Enter] (as root)

Step 6

Open make_modules.sh in your favorite editor and uncomment the line ‘make install’ and run make_modules.sh.

[root@bordeaux php_ext]# bash make_modules.sh [Enter] (as root)

Step 7

Go to ‘./tmp/modules/’ directory and copy ming.so to ‘/usr/lib/php/modules/’

1
2
[root@bordeaux php_ext]# cd tmp/modules/ [Enter]
[root@bordeaux modules]# cp ming.so /usr/lib/php/modules/ [Enter] (as root)

If ming.so is not found in ‘php_ext/tmp/modules/, then update your db using ‘updatedb’ and locate ming.so and if found on locate, then copy it to ‘/usr/lib/php/modules/’. If not found at all, try recompiling or issue some random commands related to make.

Step 8

Go to ‘/usr/local/lib/’ and check if libming.so, libming.so.0 etc. are present there. If yes proceed else I don’t know what to do 🙁

Step 9(a)

Go to ‘/usr/lib/php/modules/’ and issue these commands.

1
2
3
4
[root@bordeaux modules]# ln -s /usr/local/lib/libming.so libming.so (as root)
[root@bordeaux modules]# ln -s /usr/local/lib/libming.so.0 libming.so.0 (as root)
[root@bordeaux modules]# ln -s /usr/local/lib/libming.so.0.3.0 libming.so.0.3.0 (as root)
[root@bordeaux modules]# ln -s /usr/local/lib/libming.so.0.4.0 libming.so.0.4.0 (as root)

Step 9(b)

Go to ‘/usr/lib/’ and issue these commands.

1
2
3
4
[root@bordeaux lib]# ln -s /usr/local/lib/libming.so libming.so (as root)
[root@bordeaux lib]# ln -s /usr/local/lib/libming.so.0 libming.so.0 (as root)
[root@bordeaux lib]# ln -s /usr/local/lib/libming.so.0.3.0 libming.so.0.3.0 (as root)
[root@bordeaux lib]# ln -s /usr/local/lib/libming.so.0.4.0 libming.so.0.4.0 (as root)

Step 10

Restart the httpd service by issuing the command below

[root@bordeaux root]# service httpd restart [Enter] (as root)

Step 11

Write a file ‘/var/www/html/info.php’ with following contents

phpinfo();

and point your web browser to http://localhost/info.php . Now search for ‘ming’ and check whether its enabled or not.

PHP Ming in Fedora

If enabled, yes you have successfully installed php-ming 🙂 Hope this helps.