Review: Spicebird – A Collaboration Platform

Well, I happened to attend this workshop on “How to build business around open source tools” organized by Twincling Society and IIIT Hyderabad. There I came to know about Spicebird. Spicebird is a single platform for many collaboration needs. It provides e-mail, calendaring and instant messaging with intuitive integration and unlimited extensibility. Spicebird is being developed by a Hyderabad based Indian start-up named Synovel (All four founders are alumni of IIIT Hyderabad). Below we look at some features that Spicebird provides.

1. Tabbed Interface

The tabbed interface for different utilities like mail, calendar, contacts, tasks etc. looks pretty clean. The interface is not at all cluttered in any way and navigation to different utilities is straight forward. You don’t have to brainstorm before getting something done.

2. Familiar Interface & Crisp Icon Set

Spicebird has an interface similar to loads of mozilla based application out there. The settings, preferences and the way things have been managed are familiar. So people who are switching from other open source email clients will not face any problems at all. Spicebird uses icons from Tango Project. The icons used are really good looking.

3. Nice Home Tab

The way Home tab has been organized is really appealing. You can add applets which includes rss feeds from you favourite blogs, mail folder views, calendar, upcoming events and Date & Time. Geeks love rss feeds. And what can be better than having it on your home tab all the time along with your mails. Event applet comes handy to remind you of the upcoming meetings and deadlines. And its on home tab all the time 🙂 Date & Time is specially helpful when you collaborate with people in different timezones. So you can add their timezone on home tab and you know when is the right time to ping them.

Spicebird Home Tab

4. Email

Email experience is more or less like any other open source email client. But Spicebird provides some intitutive features like if it finds that the content of a mail is about a meeting, it’ll give an option for creating a calendar event for the same. This is a really good feature and this is just the begining. Spicebird is still beta.

SpiceBird Intutive Mail

5. Instant Messaging

This is a really cool feature from collaboration point of view and which makes Spicebird different from the masses. Spicebird is supporting IM via any jabber server. So if you are a startup, setup your own jabber server on Intranet and use it for collaboration. Mind blowing!! This also includes Gmail/GTalk. So you can just say bye bye to your messenger and start using it right away with GTalk. Plus this will import all your contacts to your local address book. Another real good feature which is not there in lot of other email clients.

SpiceBird Instant Message using Jabber, GTalk

6. Calendar & Task Management

Another good feature. Integrated calendar and task management. You can quickly add tasks and events. And you need not check your calendar for upcoming events, add upcoming event applet on home tab and you will have them all the time in front of your eyes 🙂

Spicebird Calendar and Task Manager

Conclusion

Whether you are a startup which is looking for tools to collaborate or a user who is excited about using open source tools, just go and download Spicebird from here and explore a new way of managing things at a single place 🙂

You can look at Spicebird Roadmap here and checkout the video demo of Spicebird here.


How To: Write Custom Redirector or Rewritor Plugin For Squid in Python

Mission

To write a custom Python program which can act as a plugin for Squid to redirect a given URL to another URL. This is useful when already existing redirector plugins for Squid doesn’t suit your needs or you want everything of your own.

Use Cases

  1. When you want to redirect URLs using a database like mysql or postgresql.
  2. When you want to redirect based on mappings stored in simple text files.
  3. When you want to build a redirector which can learn by itself using AI techniques 😛

How to proceed

From Squid FAQ,

The redirector program must read URLs (one per line) on standard input, and write rewritten URLs or blank lines on standard output. Note that the redirector program can not use buffered I/O. Squid writes additional information after the URL which a redirector can use to make a decision.

The format of the line read from the standard input by the program is as follows.

1
2
3
URL ip-address/fqdn ident method
# for example
http://saini.co.in 172.17.8.175/saini.co.in - GET -

The implementation sounds very simple and it is indeed very simple to implement. The only thing that should be taken care of is the unbuffered I/O. You should immediately flush the output to standard output once decision is taken.

For this howto, we assume we have a method called ‘modify_url()‘ which returns either a blank line or a modified URL to which the client should be redirected.

1
2
3
4
5
6
7
8
9
10
11
12
13
14
15
16
17
18
19
20
21
22
23
24
25
26
#!/usr/bin/env python
 
import sys
def modify_url(line):
    list = line.split(' ')
    # first element of the list is the URL
    old_url = list[0]
    new_url = '\n'
    # take the decision and modify the url if needed
    # do remember that the new_url should contain a '\n' at the end.
    if old_url.endswith('.avi'):
        new_url = 'http://fedora.co.in/errors/accessDenied.html' + new_url
    return new_url
 
while True:
    # the format of the line read from stdin is
    # URL ip-address/fqdn ident method
    # for example
    # http://saini.co.in 172.17.8.175/saini.co.in - GET -
    line = sys.stdin.readline().strip()
    # new_url is a simple URL only
    # for example
    # http://fedora.co.in
    new_url = modify_url(line)
    sys.stdout.write(new_url)
    sys.stdout.flush()

Save the above file somewhere. We save this example file in /etc/squid/custom_redirect.py. Now, we have the function for redirecting clients. We need to configure squid to use custom_redirect.py . Below is the squid configuration for telling squid to use the above program as redirector.

1
2
3
4
5
6
# Add these lines to /etc/squid/squid.conf file.
# /usr/bin/python should be replaced by the path to python executable if you installed it somewhere else.
redirect_program /usr/bin/python /etc/squid/custom_redirect.py
# Number of instances of the above program that should run concurrently.
# 5 is good enough but you should go for 10 at least. Anything below 5 would not work properly.
redirect_children 5

Now, start/reload/restart squid. That’s all we need to write and use a custom redirector plugin for squid.


How To: Write Custom Basic Authentication Plugin for Squid in Python

Mission

To write a Python program which can be used to authenticate for Squid proxy server. This is useful when you don’t want to configure complex systems like LDAP, ntlm etc.

Use Cases

  1. When you want to authenticate clients using mysql database.
  2. When you want to authenticate clients using flat files or /etc/passwd file or some custom service on your network.

How to proceed

From auth_param section in squid.conf file:

Specify the command for the external authenticator. Such a program reads a line containing "username password" and replies "OK" or "ERR" in an endless loop. "ERR" responses may optionally be followed by a error description available as %m in the returned error page.

By default, the basic authentication scheme is not used unless a program is specified.

That clearly states that our python program should read a line from standard input (stdin) and write the appropriate response to the standard output (stdout). But there are some issues with I/O. The output should be unbuffered and should be flushed to standard output immediately after the response is known.

So, lets see a small program where we authenticate using a function ‘matchpassword()‘. This function returns True when username, password pair matches and returns False when they mismatch.

1
2
3
4
5
6
7
8
9
10
11
12
13
14
15
16
17
18
19
20
21
22
23
24
25
#!/usr/bin/python
 
import sys
import socket
"""USAGE:The function returns True if the user and passwd match False otherwise"""
def matchpasswd(login,passwd):
    # Write your own function definition. 
    # Use mysql, files, /etc/passwd or some service or whatever you want
    pass
 
while True:
    # read a line from stdin
    line = sys.stdin.readline()
    # remove '\n' from line
    line = line.strip()
    # extract username and password from line
    username = line[:line.find(' ')]
    password = line[line.find(' ')+1:]
 
    if matchpasswd(username, password):
        sys.stdout.write('OK\n')
    else:
        sys.stdout.write('ERR\n')
    # Flush the output to stdout.
    sys.stdout.flush()

Save the above file somewhere. We save this example file in /etc/squid/custom_auth.py .Now, we have the function for authenticating clients. We need to configure squid to use custom_auth.py . Below is the squid configuration for telling squid to use the above program as basic authenticator.

1
2
3
4
5
6
7
8
9
10
11
# you need to specify /usr/bin/python if your file is not executable and needs an interpreter to be invoked.
# Replace /usr/bin/python with /usr/bin/php , if you write auth program in php.
auth_param basic program /usr/bin/python /etc/squid/custom_auth.py
# how many instances of the above program should run concurrently
auth_param basic children 5
# display some message to clients when they are asked for username, password
auth_param basic realm Please enter your proxy server username and password
# for how much time the authentication should be valid
auth_param basic credentialsttl 2 hours
# whether username, password should be case sensitive or not
auth_param basic casesensitive on

Now, to force clients to authenticate, configure the acls as follow. Below we assume, you want to force all clients on your lan to authenticate for using proxy server.

1
2
3
4
5
6
# acl to force proxy authentication
acl authenticated proxy_auth REQUIRED
# acl to define IPs from your lan
acl lan src 192.168.0.0/16
# acl to force clients on your lan to authenticate
http_access allow lan authenticated

Now, reload/restart squid. That’s all we need to write and use a custom authentication plugin for squid.

Limitation

Username can’t contain spaces. Otherwise program will not be able to parse/extract username, password from standard input.


How To: Install FFMPEG and FFMPEG-PHP

I was randomly browsing the internet and reading about making a website look better and I encountered ffmpeg-php. ffmpeg is a very powerful tool to record, convert and stream audio and video. Its a very rich tool almost supporting every format out there in the world. It can convert any format to any other format provided the codec. ffmpeg-php is an extension for PHP that provides a rich library to access info about audio and video files. The good thing about ffmpeg-php is that it can retrieve all info about any audio/video file subjected to the condition that the particular audio/video format is supported by your ffmpeg installation. So, now you have a clear idea that you can do wonders with audio/videos while showing them on your site 🙂

I tried some of the functionalities and they worked out of the box. Here’s is complete how to on installing ffmpeg and ffmpeg-php.

FFMPEG:

I tried installing ffmpeg from rpms provided by several Fedora repositories but after installation ffmpeg doesn’t seem to work. After several tries, I installed ffmpeg from source rpms and it worked. Below, I will describe how to install ffmpeg from source rpm.

Step 1:

Make sure that you have ‘rpmbuild’ installed by issuing

[root@bordeaux saini]# rpm -q rpmbuild [Enter]

command. If the above says that rpmbuild is not installed, then install it using yum as given below

[root@bordeaux saini]# yum install rpmbuild [Enter] (do as root)

Step 2:

Download the latest src rpm of ffmpeg from rpmfind.net. Issue the command given below

[root@bordeaux saini]# rpm -hiv ffmpeg-x.x.x.xx-xxx.src.rpm [Enter] (do as root)

Step 3:

Go to ‘/usr/src/redhat/SPECS/’ directory and issue the command given below

1
2
[root@bordeaux saini]# cd /usr/src/redhat/SPECS/ [Enter]
[root@bordeaux SPECS]# rpmbuild -ba ffmpeg.spec [Enter] (do as root)

If it gives an error like package ‘xyz’ is need by ffmpeg. Then install the package ‘xyz’ using yum as

[root@bordeaux SPECS]# yum install xyz [Enter] (do as root)

After installing the dependencies, issue the rpmbuild command ‘rpmbuild -ba ffmpeg.spec’. Now ffmpeg rpms will be build and they will be stored in ‘/usr/src/redhat/RPMS/i386/’.

Step 4:

Go the ‘/usr/src/redhat/RPMS/i386/’ (x86_64 instead of i386 if your OS is 64 bit). Install all the rpms that were built by rpmbuild.

[root@bordeaux saini]# rpm -hiv *.rpm [Enter] (do as root)

Thats it. ffmpeg is now successfully installed on your computer. Half the job is done. Now lets proceed with ffmpeg-php installation.

FFMPEG-PHP:

We will install ffmpeg-php from source bundle.

Step 1:

Make sure that ‘php-devel’ installed on your machine by issuing

[root@bordeaux saini]# rpm -q php-devel [Enter]

command. If the above command says the ‘php-devel’ is not installed, then install it using the following command.

[root@bordeaux saini]# yum install php-devel [Enter] (do as root)

Step 2:

Download the latest version of ffmpeg-php from here. Unpack the file you have downloaded.

1
2
[root@bordeaux saini]# bunzip2 -d ffmpeg-php-0.5.1.tbz2 [Enter]
[root@bordeaux saini]# tar -xvf ffmpeg-php-0.5.1.tar [Enter]

Step 3:

Issue the following command in sequence if everything goes fine.

1
2
3
4
5
[root@bordeaux saini]# cd ffmpeg-php-0.5.1 [Enter]
[root@bordeaux ffmpeg-php-0.5.1]# phpize [Enter]
[root@bordeaux ffmpeg-php-0.5.1]# ./configure [Enter]
[root@bordeaux ffmpeg-php-0.5.1]# make [Enter]
[root@bordeaux ffmpeg-php-0.5.1]# make install [Enter] (do as root)

Step 4:

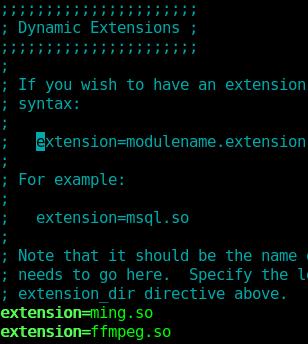
Open ‘/etc/php.ini’ and add a line ‘extension=ffmpeg.so’ in the category ‘Dynamic Extensions’. For help see the image below.
FFMPEG PHP PHPini Module

Step 5:

Restart apache web server aka ‘httpd’ service by issuing the command.

[root@bordeaux saini]# service httpd restart [Enter] (do as root)

Step 6:

Write a test php file and test your ffmpeg-php installation.

phpinfo();

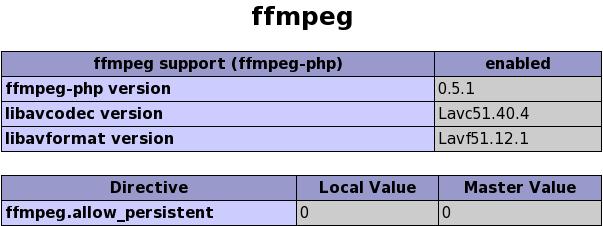
Save the above code in ‘info.php’ and save the file in ‘/var/www/html/’ and browse http://localhost/info.php . If you see something like this.
FFMPEG PHP Linux
Then the ffmpeg-php is successfully installed on your machine. Now you can jump into the world of video manipulation via your website.


How To: Configure VNC Server

Vncserver is just another application available in almost all the available Linux based distros. Configuring vncserver is very easy. But the default desktop view in vncviewer is gray scale desktop with very pathetic GUI. To view normal Gnome or KDE desktop in vncviewer, assigning a custom port for usage, user configuration and to adjust the resolution of the vncviewer window, some files need to be configured properly. Here are the required configuration in any version of Fedora/Fedora Core. But with minor modifications these can be applied to other distros like Ubuntu, SuSE, Gentoo etc.

Step 1: Installing Vncviewer, Vncserver

As root do this

[root@bordeaux saini]# yum install vnc [Enter]

Step 2: Configuring resolution, port & user

The default location of server configuration file for vncserver is ‘/etc/sysconfig/’. To configure the resolution, user and port open ‘/etc/sysconfig/vncservers’ in you favorite editor and add two lines per user configuration shown ..

VNCSERVERS=":"
VNCSERVERARGS[]="-geometry x x"

Example :

VNCSERVERS="3:saini"
VNCSERVERARGS[3]="-geometry 1000x700"

You can choose any display port, but it should not be in use by another X server. Window height and width can be anything (not in fraction of course). But keep in mind that the system on which you are going to view the desktop using vncviewer should have greater resolution than what you specify here, otherwise scrollbars will appear.

Step 3: Configuring Desktop Environment

The user specific configuration files of vncviewer resides in ‘.vnc’ directory in user’s home directory. (e.g. ‘/home/saini/.vnc/’). Open ‘.vnc/xstartup’ in your favorite editor and edit as below

  • For Gnome

The ‘xstartup’ file shout look like this

#!/bin/sh
 
# Uncomment the following two lines for normal desktop:
unset SESSION_MANAGER
exec /etc/X11/xinit/xinitrc
 
[ -x /etc/vnc/xstartup ] && exec /etc/vnc/xstartup
[ -r $HOME/.Xresources ] && xrdb $HOME/.Xresources
#xsetroot -solid grey
#vncconfig -iconic &
#xterm -geometry 80x24+10+10 -ls -title "$VNCDESKTOP Desktop" &
#twm &
startx &
  • For KDE

The ‘xstartup’ file should look like this

#!/bin/sh
 
# Uncomment the following two lines for normal desktop:
#unset SESSION_MANAGER
#exec /etc/X11/xinit/xinitrc
 
[ -x /etc/vnc/xstartup ] && exec /etc/vnc/xstartup
[ -r $HOME/.Xresources ] && xrdb $HOME/.Xresources
#xsetroot -solid grey
#vncconfig -iconic &
#xterm -geometry 80x24+10+10 -ls -title "$VNCDESKTOP Desktop" &
#twm &
startkde &

Step 4: Configuring password

For setting up vncviewer password for user ‘xyz’, login as user ‘xyz’ and issue ‘vncpasswd’ command on a terminal/konsole (or whatever). Enter password twice and you are done with password setting.

Step 5: Starting Vncserver

To start vncserver, login as root and issue ‘service vncserver start’ command. If service started successfully, you are ready to use vncviewer on a remote/local machine.

Step 6: Accessing through Vncviewer

  • From Linux based machines
[saini@bordeaux saini]# vncviewer IP_Address:displayPort [Enter] #(IP Address is for the machine where you set up vncserver)
  • From Windows

On windows there is a software called RealVnc. Install it and enter <IPAddress>:<displayPort> in the dialog box.
[I explained how to connect via windows because it may help someone get a bit of relief.]

Screenshots:

  • Vncviewer with Gnome as Desktop environment

VNC Server VNC Viewer Screenshot GNOME

  • Vncviewer with KDE as Desktop environment

VNC Server VNC Viewer Screenshot KDE

Vnc is nice tool if you want to avoid using windows. I use it all the time. While I am forced to work on windows system, I install vncviewer and use it in full screen mode 😛 It also helps when you want to run some gui based application and monitor is remotely. Because if you close vncviewer window and use vncviewer again, you will be given the desktop session where you left it (all windows open and applications running).